Here is a short video on how to install the MS810, MS811 and MS812 maintenance kit, fuser, roller and reset the maintenance counter. This video covers the installation of the following Lexmark parts. The parts are linked to our online store if you need to order them.
40X8420 maintenance kit for MS810 MS811 MS812 MX710 MX711 MX810 MS812
40X7743 fuser kit for MS810 MS811 MS812 MX710 MX711 MX810 MX812
40X7582 transfer roller
40X7593 pickup roller
40X7713 separation roller
If you see any of the following messages it’s time to install a new maintenance kit:
80 Replace maintenance kit
80 Maintenance kit — end of life
80 Maintenance kit — late warning
80 Maintenance kit — low
80 Maintenance kit — nearly low
81 Roller kit — end of life
Category Archives: Lexmark Fuser Maintenance Kit and Roller Installation Videos
My toner cartridge is leaking… but the cartridge may not be the cause.
I get this question frequently from owners of Lexmark T series printers. (T620, T630, T640 and T650 series – all types.) The most common problem with a leaking cartridge is the waste bin of the cartridge has become full and will begin to dribble out onto the paper and all over the inside of the printer.
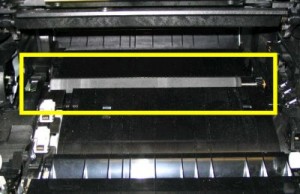
Let’s take a quick look at the printing process. Here is a simple explanation on laser printing. Open up your printer and pull out the toner cartridge and look in the top for the charge roller and the bottom for the transfer roller. Basically the toner is moved from the “hopper” to the drum and then to the paper.
We can break the printing process down into 4 steps: Charge, exposure, transfer & cleaning.
First there is the charge. In this step the drum is electrostatically ‘erased’
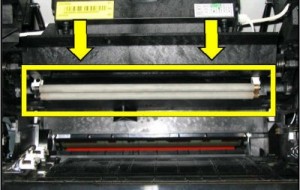
Charge roller is visible when the toner cartridge is removed and drops down from above the cartridge.
by the charge roller while it rides right on the drum. Once it’s fully erased it can be exposed.
The drum is exposed by the laser beam drawing an image on the drum.
Quite simply, wherever the laser hits the drum, toner is attracted to that spot. The drum continues to revolve as it’s passed close to the paper.
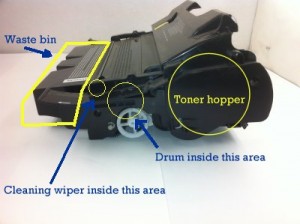
Once near the paper, the third step occurs: transfer. Toner is transferred from the drum to the paper. The transfer roller sits under the paper with a strong opposing electrical charge and pulls the toner from the drum and onto the paper. The drum continues its revolution and is cleaned internally by a wiper and any excess toner is wiped off and deposited into the waste bin.
Now, here is where the problem occurs. When the transfer roller gets worn out, less toner makes its way on to the paper and toner left on the drum is cleaned off. The result is that more toner is going into the waste bin during the cleaning wipe.
Why does the waste bin become full? Well, there is a limited amount of space in the waste bin and once this bin is full, it has no other place to go and begins to dribble out. When a transfer roller is new your prints will be very dark, crisp and will transfer nearly 100% of the toner from the drum to the paper. Over time the roller will wear out and less toner will get transferred to the paper and will be wiped off the drum with each revolution and end up in the waste bin. One solution is to keep your transfer roller fresh. If you see lighter copies, change the transfer roller right away. Try switching from the extra high yield cartridge to a lower yield cartridge. Here is an example: If you are using a 32,000 page extra high yield cartridge the waste bin on this cartridge is exactly the same as one found on a 21,000 page cartridge. More prints means more waste so you may be more likely to fill the waste bin inside a 32K if your transfer roller is only transferring 70%-80% than with a 21K.
You can order roller kits for your Lexmark T series printers here
Maintenance kits contain the transfer roller and can be ordered here
by: Thomas Braeger
Installing the fuser in the Lexmark C770 C772 C780 C782 X772e X782e MFP
Video Instructions on how to install the fuser kit and reset the message 80 Fuser
Maintenance warning
in the Lexmark C770 and C780 series printers. Order all your Lexmark printers, parts and supplies online.
http://www.fastprinters.com
This covers parts 40×1831 40X1651 40X1859
Installing the ITU in the Lexmark C770 C772 C780 C782 X772e X780e MFP
Instructions on how to install the Image Transfer Unit, (ITU) kit.83 ITU Maintenance is displayed at each 120,000 copies when
the ITU Assembly needs to be replaced to maintain the print quality
and reliability of the printer. There are two assemblies, ITU assembly
and Second Transfer Roll, in a maintenance kit.
Both should be replaced at the same time.
Maintenance warning
in the Lexmark C770 and C780 series printers.
Order all your Lexmark printers, parts and supplies online.This covers parts 40×0343, 40×1826, 40×1788, 40×0343, 40×1738
YouTube – Lexmark T620 T622 Fuser Maintenance Kit Replacement How to Install
YouTube – Lexmark T620 T622 Fuser Maintenance Kit Replacement How to Install.
Click the link above to view the video.
Installation instructions for replacement of the fuser and maintenance kit parts.
Order all your Lexmark printers, parts and supplies online at:
http://www.fastprinters.com
Kit part number 99A2408 or 99A2411 includes Fuser 99A2402 or 99A2405 pickup tire 99A0070 or 40X0070 transfer roller 99A1015 and charge roller 99A1015 printer repair parts
80 Scheduled Maintenance Message
YouTube – Installing the Transfer Belt Maintenance Kit ITU C750 C752 C760 C762 X750e MFP X752e X762e MFP ITU
YouTube – Installing the Transfer Belt Maintenance Kit ITU C750 C752 C760 C762 X750e MFP X752e X762e MFP ITU.
Click the link above to view the video.
Instructions on how to install the transfer belt maintenance kit and
reset the message 83 ITU Maintenance warning in the Lexmark C750 and
C760 series printers.
YouTube – Installing the fuser in the Lexmark C750 C752 C760 C762 X750e X752e X762e MFP
YouTube – Installing the fuser in the Lexmark C750 C752 C760 C762 X750e X752e X762e MFP.
Click the link above to view the video.
Instructions on how to install the fuser kit and reset the message 80 Fuser
Maintenance warning
in the Lexmark C750 and C760 series printers. Order all your Lexmark
printers, parts and supplies online at:
http://www.fastprinters.com
This covers parts 12G6301 12G6496 56P2851 56P2910
YouTube – Installing the Transfer Belt Maintenance Kit ITU 56P9903 in the Lexmark C910 C912
YouTube – Installing the Transfer Belt Maintenance Kit ITU 56P9903 in the Lexmark C910 C912.
Click the link above to view the video.
Instructions on how to install the transfer belt maintenance kit and reset the message 80 Belt Life Warning in the Lexmark C910 and C912 series printers. Order all your Lexmark printers, parts and supplies online at: http://www.fastprinters.com This covers part 56P9903 or 56P9694
YouTube – Installing the fuser in the Lexmark C910 C912 C912dn C912fn X912e MFP
YouTube – Installing the fuser in the Lexmark C910 C912 C912dn C912fn X912e MFP.
Click the link above to view the video.
Instructions on how to install the fuser oil coating roller and reset the message 80 Fuser Life Warning in the Lexmark C910 and C912 series printers. Order all your Lexmark printers, parts and supplies online at: http://www.fastprinters.com This covers parts 56P9900, 56P9751 and 12N0774
YouTube – Lexmark T640 T642 T644 Fuser Maintenance Kit Replacement
YouTube – Lexmark T640 T642 T644 Fuser Maintenance Kit Replacement.
Click the link above to view the video.
Order the T640 series fuser and maintenance kits here.
Installation instructions for replacement of the fuser and maintenance kit parts. Order all your Lexmark printers, parts and supplies online at: http://www.fastprinters.com
Kit part number 40X0100 includes Fuser 40X2592 or 40X0116, pickup tire 40×0070 or 99A0070, transfer roller 99a1015 and charge roller 40X0127 printer repair parts
Also applies to IBM Infoprint 1532 1552 1572 T640n T642n T644n Your printer may display 80 scheduled maintenance message

